🌎 Helm & Gateway API
🔥 At this point in the workshop you have a choice:
- Recommended: If you want to learn about the Gateway API, which is the current and future of L4/L7 routing in Kubernetes, stay in this section and continue with the Gateway API. This is the recommended path for new applications and most people.
- Not recommended: If you want to learn about the legacy Ingress API, go to the Helm & Ingress section. This is widely supported and in wide use, but it has been superseded in functionality and is falling out of favor in the Kubernetes ecosystem.
🔥 Only go through one of these two sections, not both!
For this section we'll touch on several slightly more advanced topics all at once, these are
- Use of namespaces to separate resources
- Installing Custom Resource Definitions (CRDs)
- Use of Helm
- Introducing a gateway data plane to our cluster.
This seems like a lot, but we won't be covering everything in detail, some of it like Helm is just a tool. The gateway will let us further refine & improve the networking aspects of the app we've deployed.
📌 The Gateway API
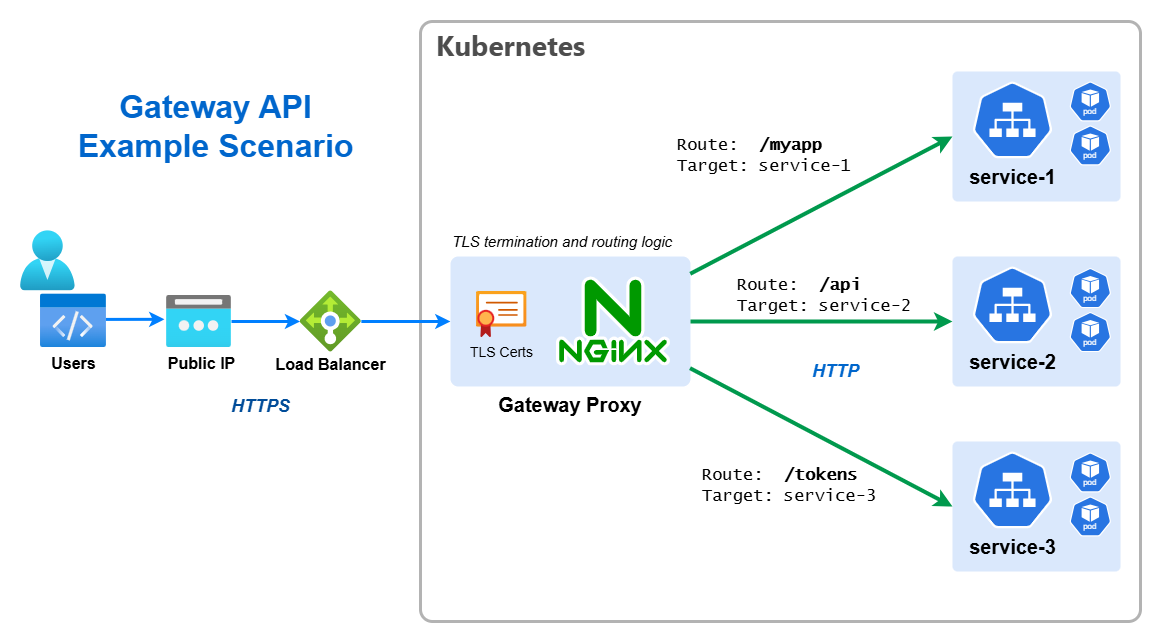
The Kubernetes Gateway API is an official Kubernetes project focused on L4 and L7 routing in Kubernetes. This project represents the next generation of Kubernetes Ingress, Load Balancing, and Service Mesh APIs. It is designed to improve upon the older Ingress API by providing more expressive and extensible resource definitions. It has reached a stable v1.0 release and is now considered production ready.
📚 Learn more about the Gateway API
Naming minefield ahead! ☠️
There's many overlapping terms & naming we need to differentiate. Firstly services like AWS API Gateway or Azure API Management & Azure App Gateway, and secondly generically using the term "API Gateway" when describing a system or architecture. These are not what we are talking about here, the Gateway API is a Kubernetes-native API for defining and managing L4/L7 routing. Look I know, it's confusing, naming things is hard!
🧙 Intro to Custom Resources
Kubernetes is designed to be extensible, in fact, extremely so. The core Kubernetes API is made up of a number of pre-defined resources like Pods, Deployments, Services, etc. Which you're no doubt familiar with.But Kubernetes also allows anyone to define their own resources, these are called Custom Resources. The Gateway API is implemented as a set of Custom Resources this allows it to be implemented in a way that is fully compatible with Kubernetes, and allows it to evolve independently of the core Kubernetes API.
Before we can use the Gateway API in our cluster and create instances of the resources, we need to install these Custom Resource Definitions (CRDs) which define the new resources. This is done with a single command:
kubectl apply --server-side -f https://github.com/kubernetes-sigs/gateway-api/releases/download/v1.4.1/standard-install.yamlThat's it, the CRDs are now installed and we can start creating Gateway API resources in our cluster.
🗃️ Namespaces
So far we've worked in a single Namespace called default, but Kubernetes allows you create additional Namespaces
in order to logically group and separate your resources.
Namespaces do not provide any form of network boundary or isolation of workloads, and the underlying resources (Nodes) remain shared. There are ways to achieve higher degrees of isolation, but it is a matter well beyond the scope of this workshop. But they still provide a useful way to separate resources, and in this section we'll create a new namespace for the gateway resources, so that they are separate from the application resources.
Create a new namespace called nginx-gateway:
kubectl create namespace nginx-gatewayNamespaces are simple idea but they can trip you up, you will have to add --namespace or -n to any kubectl
commands you want to use against a particular namespace. The following alias can be helpful to set a namespace as the
default for all kubectl commands, meaning you don't need to add -n, think of it like a Kubernetes equivalent of the
cd command.
# Note the space at the end
alias kubens='kubectl config set-context --current --namespace '
Then you can switch namespaces with kubens {namespace-name}, e.g. kubens ingress or kubens default. You can check
the current namespace with kubectl config view --minify | grep namespace:.
🪖 Introduction to Helm
Helm is an CNCF project which can be used to greatly simplify deploying applications to Kubernetes, either applications written and developed in house, or external 3rd party software & tools.
- To use Helm, the Helm CLI tool
helmis required. - Helm simplifies deployment using the concept called a chart, when a chart is deployed it is refereed to as a release.
- A chart consists of one or more Kubernetes YAML templates + supporting files.
- Helm charts support dynamic parameters called values. Charts expose a set of default values through their
values.yamlfile, and these values can be set and over-ridden at release time. - The use of values is critical for automated deployments and CI/CD.
- Charts can referenced through the local filesystem, or in a remote repository called a chart repository
It's the ability to dynamically inject values into templates which makes Helm so powerful, and allows it to be used for both simple and complex deployments.
🚪 Deploying the NGINX Gateway
For this section we'll be using the NGINX Gateway as our gateway implementation, this is a open source project which supports the Gateway API. There are other options available, including commercial products, but NGINX is a good choice for this workshop as it is free, open source, and widely used.
helm install ngf oci://ghcr.io/nginx/charts/nginx-gateway-fabric --namespace nginx-gatewayThis command does the following:
helm install- installs a new Helm chart as a releasengf- the name of the release, you can choose any name you like, it's normally appended to the names of the resources created by the chart, so it should be short and descriptiveoci://ghcr.io/nginx/charts/nginx-gateway-fabric- the location of the chart, in case it's a special type of remote URL--namespace nginx-gateway- the namespace to install the NGINX controller & proxy into
🛠️ Configuring the Gateway
Now we have the NGINX Gateway installed, we need to configure it to route traffic to our application. This is done using
a Gateway resource, this would typically be set up once by a cluster administrator, not the application developer, but
today we are wearing multiple hats!
Create a file called gateway.yaml with the following content:
apiVersion: gateway.networking.k8s.io/v1
kind: Gateway

metadata:
  name: nanomon-gateway

spec:
  gatewayClassName: nginx
  listeners:
    - name: http
      port: 80
      protocol: HTTP
      # This is required to allow routes from other namespaces
      allowedRoutes:
        namespaces:
          from: All
Normally the
hostnamefield would be set to a specific hostname, or some wildcard, but for this workshop we are using the external IP address of the Load Balancer without any DNS, so we leave it unset.
Apply the configuration but place it in the nginx-gateway namespace with the following command. This allows us to
separate the gateway resources from the application resources:
kubectl apply -f gateway.yaml -n nginx-gateway
This will actually create the gateway instance (the Helm install you ran previously didn't do that), i.e. the NGINX
proxy which will route traffic, and along with it a Service of type LoadBalancer which will give it an external IP
address.
To get this external IP address, run: kubectl get svc -n nginx-gateway and look for the service called
nanomon-gateway-nginx. It may take a few minutes for the external IP to be assigned, but once it is, make a note of
it.
If you go to this external IP address in your browser, you should see a 404 error, this is because we haven't yet configured any routes to our application.
🔒 Reconfiguring The App
Now we need to modify the app we've deployed to route through our new new gateway, but a few simple changes are required
first. As the gateway will be fronting all requests, the services in front of the deployments should be switched back to
internal i.e. ClusterIP.
- Edit both the data API & frontend Service YAML manifests, change the service type to
ClusterIP - Change the ports to
8000for the API and8001for the frontend, this is the ports the containers are listening, remove thetargetPortfield, so they look like this:ports: - protocol: TCP port: 8000 - Edit the frontend Deployment YAML manifest, change the
API_ENDPOINTenvironmental variable to use the same origin URI/apino need for a scheme or host.
Apply these three changes with kubectl and now the app will be temporarily unavailable. Note, if you have changed
namespace with kubens you should switch back to the default namespace before running the apply!
If run kubectl get svc you should see both services are now of type ClusterIP and have no external IP associated.
🔀 Configuring Routes
Routes are configured using two new resources, HTTPRoute and TLSRoute. For this workshop we'll just be using
HTTPRoute.
[📚 HTTPRoute Resource](https://gateway-api.sigs.k8s.io/api-types/httproute/
Create a file called http-route.yaml with the following content:
apiVersion: gateway.networking.k8s.io/v1
kind: HTTPRoute

metadata:
  name: nanomon-routes

spec:
  parentRefs:
    - namespace: nginx-gateway
      name: nanomon-gateway
      sectionName: http
  rules:
    - matches:
        - path:
            type: PathPrefix
            value: /
      backendRefs:
        - name: frontend
          port: 8001
    - matches:
        - path:
            type: PathPrefix
            value: /api
      backendRefs:
        - name: api
          port: 8000
This configuration does the following:
- Creates a
HTTPRouteresource - Links the route to the
nanomon-gatewaygateway we created earlier, which is in thenginx-gatewaynamespace - Defines two routing rules:
- Requests with a path prefix of
/are routed to thefrontendservice on port8001 - Requests with a path prefix of
/apiare routed to theapiservice on port8000
- Requests with a path prefix of
Apply the configuration with: kubectl apply -f http-route.yaml
You could have defined two separate
HTTPRouteresources, each with a single rule, but this is more concise and it's unlikely you'd want to manage them separately.
If you go to the external IP address of the gateway in your browser, you should now see the frontend of the app. Also if
you go to http://<external-ip>/api/status you should see the API status endpoint.
🖼️ Cluster & Architecture Diagram
We've reached the final state of the application deployment, yes I promise this time! The resources deployed into the cluster & in Azure at this stage can be visualized as follows:
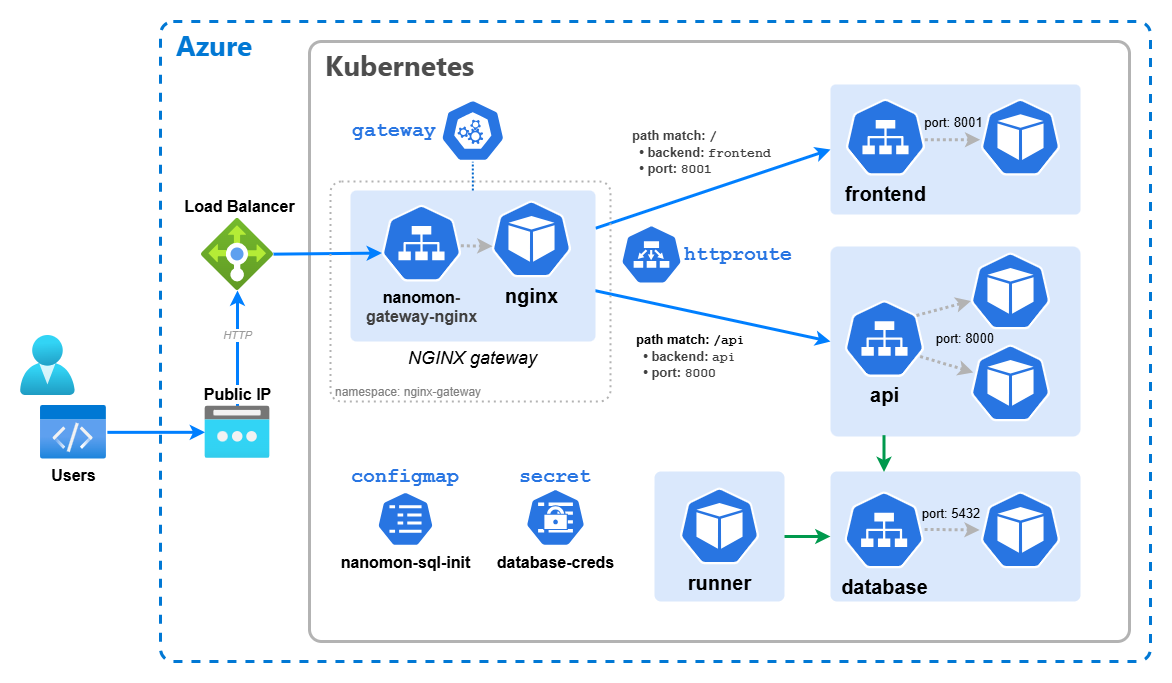
This is a slightly simplified version from previously in order to fit everything in, so things like the Deployment resources have been omitted.